The end of a lease can feel like a chaotic race against the clock. Between coordinating movers, packing your life into boxes, and planning for your new home, it’s easy to let important details slip. Unfortunately, small oversights during the move-out process can lead to big deductions from your security deposit. This guide is designed to cut through the chaos and give you a clear path forward. We’ve broken down the entire process into simple, actionable move out instructions. From writing the perfect notice to vacate to preparing for the final inspection, we’ll walk you through each step so you feel organized, confident, and ready to get your deposit back.
Moving out can feel like a huge project, but breaking it down into smaller, manageable tasks makes all the difference. The key to a smooth transition is starting early and staying organized. Before you even think about packing a single box, there are a few foundational steps you need to take. By creating a timeline, gathering your essential paperwork, and clearing out the clutter, you’ll set yourself up for a much less stressful move. Let’s walk through how to get started.
The moment you know you’re moving, it’s time to map out a plan. A good moving timeline is your best friend. Start by checking your lease agreement for the required notice period. Most landlords require a 30- to 60-day written notice, so submitting your official "Notice to Vacate" should be your first step. Once that’s done, work backward from your move-out date. Schedule key tasks like hiring movers, packing non-essential items, and arranging for a deep clean. Using a detailed moving checklist can help you stay on track and ensure nothing important falls through the cracks. A little planning now prevents a lot of panic later.
Next, pull together all your critical paperwork into one safe, accessible place. Think of it as your moving command center. This folder, whether physical or digital, should contain a copy of your current lease, your written notice to vacate, and any correspondence with your landlord. It’s also a great place to keep your new lease agreement and other essential documents you’ll need for your next place. As you start packing, create a simple inventory of what’s in each box. This will be a lifesaver when you’re unpacking and is crucial for insurance purposes if anything gets lost or damaged. Having your portable tenant screening report ready will also streamline applications for your next home.
Moving is the perfect opportunity to get rid of things you no longer need. The less you have to pack, the easier (and cheaper) your move will be. Go through your apartment room by room and decide what to keep, sell, donate, or toss. A good rule of thumb is to let go of anything you haven't used in the past year. You can sell valuable items online or through consignment shops to make some extra cash for moving expenses. For everything else, consider donating to a local charity that can put your gently used goods to good use. Decluttering not only lightens your load but also gives you a fresh start in your new space.
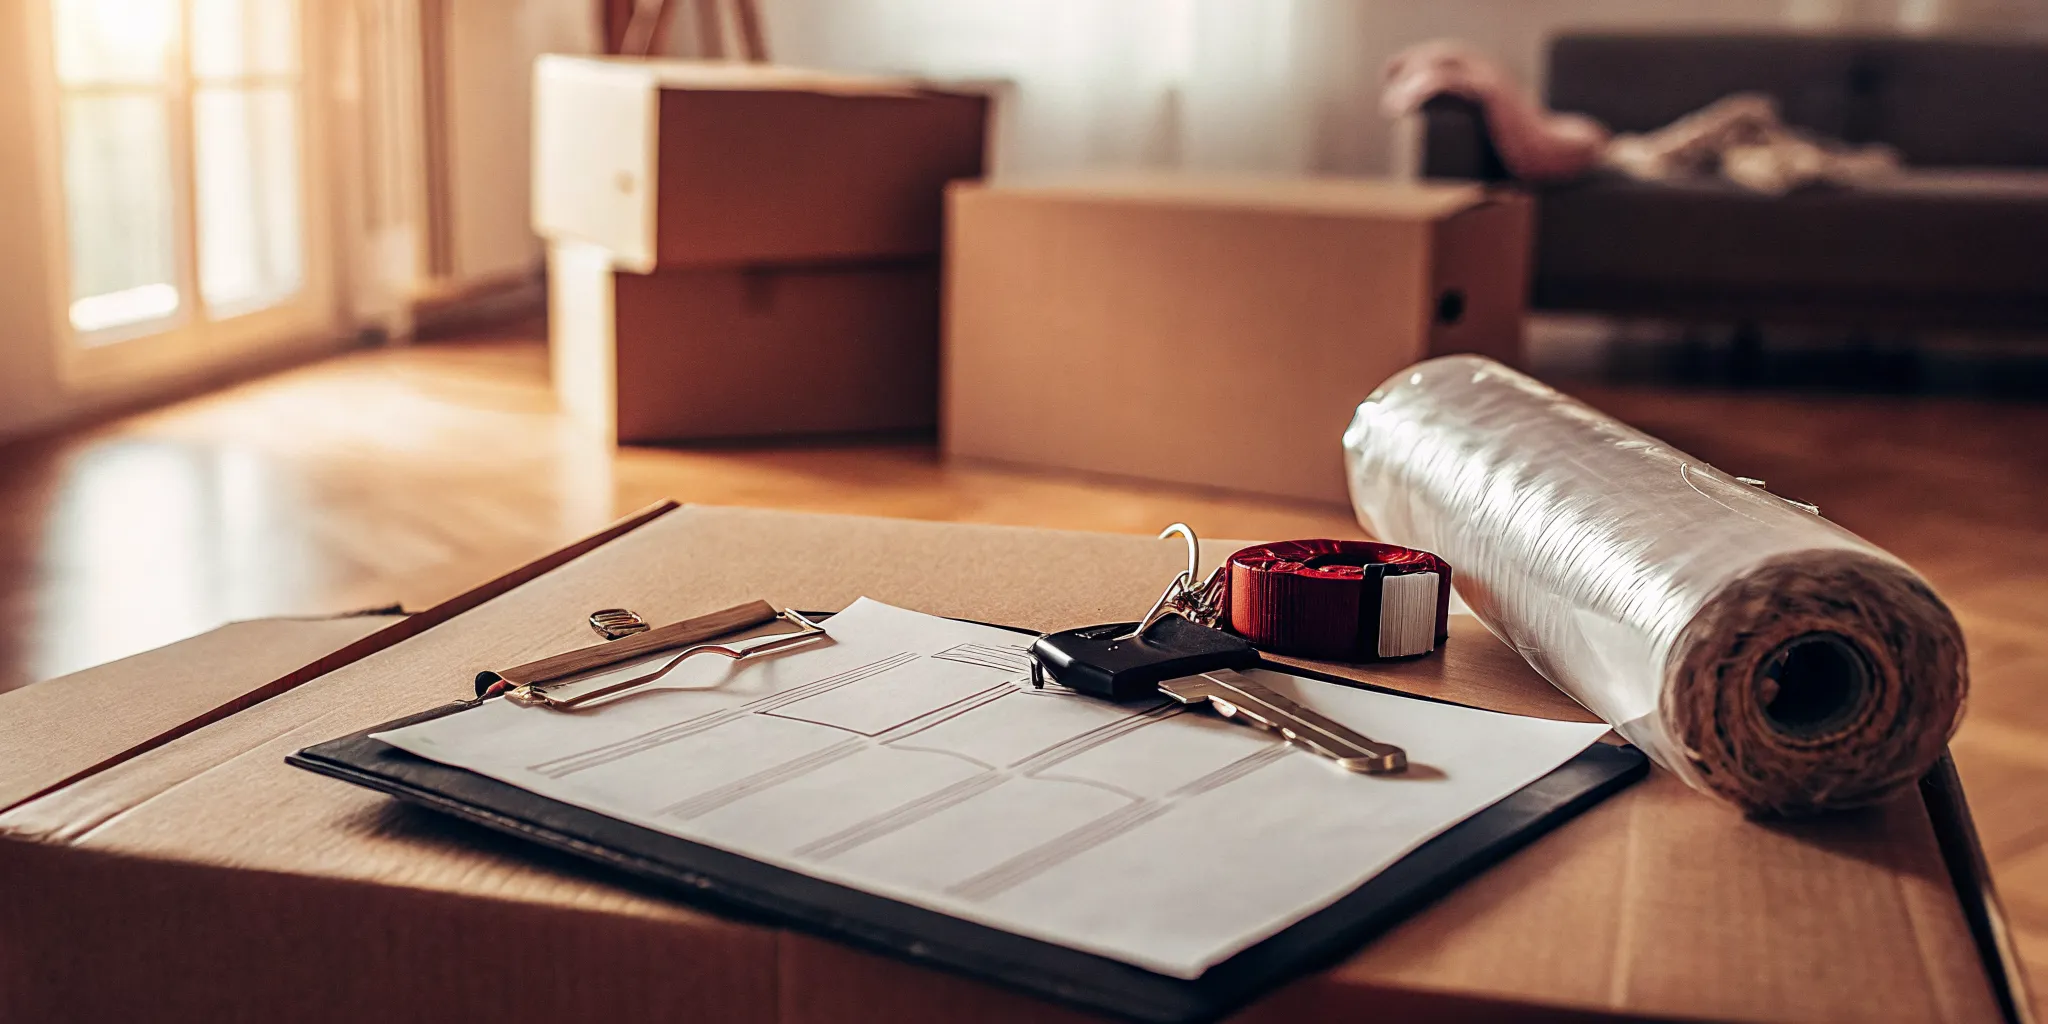
Moving out starts long before you pack the first box. The very first step is formally notifying your landlord, and doing it correctly sets the stage for a smooth transition and helps ensure you get your security deposit back. This isn't just about sending a quick text; it's a formal process outlined in your lease agreement. Following the rules protects both you and your landlord from any misunderstandings. Think of it as the official start to your moving journey. By handling your notice professionally, you maintain a positive relationship with your landlord, which can be helpful if you ever need a reference. Plus, it's your first opportunity to show you're a responsible tenant, right up to the very end.
First, pull out your lease agreement. It’s your primary guide and will tell you exactly how much notice you need to give, which is typically 30 to 60 days. If your lease has converted to a month-to-month agreement, the rules might be slightly different. This is where your local laws come into play. Each state has specific landlord-tenant laws that outline the minimum notice period required. A quick search for your state’s regulations will give you the clear, legal timeline you need to follow. Sticking to these deadlines is non-negotiable if you want to avoid any penalties.
Your notice should be a formal, written letter, often called a "Notice to Vacate." Keep it simple, professional, and to the point. Make sure to include a few key pieces of information: the current date, your name and address, a clear statement that you intend to move, and the exact date you’ll be vacating the property. It’s also a great idea to include your new forwarding address so your landlord knows where to send your security deposit. Don't forget to sign and date it. You can find plenty of free templates online to get you started.
How you deliver your notice is just as important as what it says. Check your lease one more time, as it might specify the delivery method, like certified mail or hand-delivery. Whatever the method, you need proof that your landlord received it. If you send it via certified mail, you’ll get a receipt. If you drop it off in person, ask for a signed and dated copy for your records. Keep this proof with all your other important moving documents in a dedicated folder. This simple step prevents any disputes about whether you gave notice on time and keeps everything organized.
With your notice submitted, it’s time to focus on the logistics of moving out. This checklist breaks down the process into manageable steps, helping you stay organized and on track. Following these steps is your best strategy for a smooth transition and, most importantly, for getting your full security deposit back. Think of this as your game plan for leaving your old place in great shape and starting fresh in your new one without any loose ends.
Your goal is to leave the apartment looking as it did when you first moved in. A thorough cleaning is non-negotiable. Start by working through one room at a time, so the task feels less overwhelming. In the kitchen, clean inside all appliances like the oven and refrigerator, and wipe down every cabinet, inside and out. In the bathrooms, scrub the tub, toilet, and sink, and don’t forget the floors and mirrors. For the main living areas and bedrooms, focus on vacuuming or mopping floors, cleaning windows, and dusting all surfaces. If you have carpets, consider renting a carpet cleaner for a deep clean, especially if you have pets or visible stains.
Before you start cleaning, take a walk through the apartment to look for any damage beyond normal wear and tear. Small issues are often easy and inexpensive to fix yourself. You can patch small nail holes in the walls, replace any burnt-out lightbulbs, and touch up minor paint scuffs if you have the matching paint. Taking care of these small repairs shows your landlord you’ve cared for the property and can prevent deductions from your security deposit. For larger problems, it’s usually best to report them to your landlord instead of attempting a fix that could make things worse. Honesty and proactive communication go a long way.
Managing your utilities is a critical step to avoid paying for services you’re no longer using. A few weeks before your move, contact your utility providers (electricity, gas, water, internet, and cable) to schedule a service stop date. The best approach is to have services at your old place disconnected at the end of your move-out day and services at your new home connected the day before you arrive. This ensures you won’t be left in the dark or without Wi-Fi. Don’t forget to cancel any other local subscriptions you might have, such as a gym membership, newspaper delivery, or community services.
Ensuring your mail follows you to your new home is essential. You can easily set up mail forwarding online through the USPS website or by filling out a form at your local post office. This service will redirect your mail for up to a year, giving you plenty of time to update your address everywhere else. Make a list of all the places you’ll need to notify of your move. This includes your bank, credit card companies, your employer’s HR department, any subscription boxes you receive, and government agencies like the DMV. Taking care of these administrative tasks early prevents missed bills, lost packages, and future headaches.
Your security deposit is your money, and you deserve to get it back. The best way to ensure a smooth return is to leave no room for debate about the condition of your apartment when you leave. This means creating a clear record of your tenancy from start to finish. It might feel like extra work, but a little documentation now can save you a lot of money and stress later. Think of it as creating an insurance policy for your deposit. By taking a few simple steps, you can build a strong case and protect your finances.

Your phone is your best tool for protecting your deposit. Take photos and videos of the property when you move in and when you move out to show its condition. This visual documentation can serve as crucial evidence if any disputes come up. Don't just take a quick video of the whole place; get detailed. Capture wide shots of each room, then zoom in on any pre-existing issues like scuffs on the wall, a crack in a tile, or a stain on the carpet. Make sure your photos are well-lit and timestamped. Using a detailed move-in checklist can guide you through this process, ensuring you don't miss a thing.
Visuals are powerful, but a written record provides essential context. Any time you communicate with your landlord about the property, make a note of it. Be sure to tell your landlord about any damage or issues in the home as soon as they happen. Keeping a detailed written record of these communications can help protect your interests and ensure you aren't held responsible for pre-existing problems. Your log should include the date, the person you spoke with, and a summary of the conversation. The easiest way to do this is by communicating through email, which creates an automatic, timestamped paper trail. Maintaining a professional and clear line of communication with your landlord is always a smart move.
Don't wait for the final walkthrough to see what your landlord finds. Get ahead of potential issues by doing your own inspection a week or two before you move out. Some property managers might even offer an informal check after you give notice, which can help you know what needs fixing. This gives you a chance to address small problems yourself, like filling nail holes or touching up paint. It’s almost always cheaper to handle these minor repairs on your own than to have the cost deducted from your deposit. This pre-inspection helps you identify any potential issues before the final walkthrough, giving you time to make things right. You can use a comprehensive move-out checklist to make sure you cover all your bases.
Moving is chaotic, and it’s easy for small details to slip through the cracks. Unfortunately, some of these oversights can take a serious bite out of your security deposit. By being aware of the most common pitfalls, you can protect your money and end your tenancy on a positive note. Here are the key mistakes to watch out for as you prepare to hand over the keys.
Your lease agreement is your guide for the entire move-out process. It specifies exactly how much notice you need to give, which is typically 30 to 60 days. Submitting your written "Notice to Vacate" on time is non-negotiable. Missing this deadline can result in hefty fees, an extra month's rent, or a negative mark on your rental history. Before you do anything else, pull out your lease and find the clause on termination. Following those rules to the letter is the first step in a successful move and is a key part of maintaining a good relationship with your landlord.
Your goal should be to leave the apartment in the same condition you found it, allowing for normal wear and tear. A landlord can legally use your security deposit to cover the cost of cleaning or repairs needed to get the unit ready for the next tenant. This means you need to do more than a quick wipe-down. Deep clean the kitchen appliances, scrub the bathrooms, and address any minor damage you may have caused, like filling nail holes. Following a thorough move-out checklist ensures you don’t miss anything and maximizes your chances of getting your full deposit back.
Keeping an open line of communication with your landlord or property manager is crucial during your move. Don't wait for them to reach out to you. Be proactive about scheduling the final walkthrough, asking questions about their expectations, and confirming where to leave the keys. If you've repaired any damage, let them know. A quick email or phone call can clear up misunderstandings before they become disputes over your security deposit. A little communication goes a long way in making the entire process smoother for everyone involved and helps you part on good terms.
This final step seems simple, but it’s surprisingly easy to forget in the rush of moving day. Make a plan to return every single key you were given. This includes keys for your apartment, mailbox, building entrance, and any storage units, as well as fobs or garage door openers. If you don't return them all, your landlord can charge you the cost of changing the locks and making new keys, which can be more expensive than you think. Hand the keys directly to your landlord or the office staff and, if possible, get a signed note confirming their return.
The final walkthrough is your last chance to make a good impression and secure your full security deposit. This isn't just a quick glance around the apartment; it's a detailed inspection where your landlord assesses the property's condition against how it looked when you moved in. Being prepared is key to a smooth and successful walkthrough. It allows you to address any potential issues head-on and leave on positive terms, which is always a good thing for future rental references. Let's walk through how to get ready for this important meeting.
Your landlord will likely use a move-out checklist to guide their inspection, so you should know what’s on it. This list details everything they’ll examine, from the cleanliness of the oven to the condition of the walls and floors. Common items include checking for scuffs, ensuring all appliances are working, and confirming there are no new damages beyond normal wear and tear. The best approach is to ask your property manager for a copy of their specific checklist beforehand. This way, you can see the space through their eyes and focus your cleaning and repair efforts on exactly what they’ll be looking for.
It might be tempting to just drop off the keys and go, but you should always be present for the final walkthrough. Attending the inspection allows you to discuss the property's condition with your landlord in real time. If they point out an issue, you can provide context, like referencing your move-in photos to show it was pre-existing. Being there prevents misunderstandings and gives you a chance to agree on any potential deductions on the spot. It’s a crucial step in protecting your renter rights and ensuring the assessment is fair and accurate. Think of it as your final opportunity to advocate for yourself and your deposit.
To avoid surprises during the final walkthrough, ask your landlord if they can do an informal pre-inspection a week or two before you move out. This gives you a clear punch list of what needs to be fixed or cleaned to meet their standards. It’s almost always cheaper to handle these minor repairs yourself than to have the cost deducted from your security deposit. If a pre-inspection isn't possible, do a meticulous check on your own. Replace burnt-out lightbulbs, patch small nail holes, and touch up any paint scuffs. These small efforts show you’ve cared for the property and can make a big difference in your landlord’s final assessment.
Getting your security deposit back is the final piece of the moving puzzle. It’s your money, and you deserve to have it returned promptly and fairly. The process can feel a little mysterious, but it doesn’t have to be. The key is understanding the difference between normal wear and tear and actual damage, knowing the legal timeline your landlord has to follow, and being prepared to act if they unfairly withhold your funds. By taking a few proactive steps, you can protect your deposit and end your tenancy on a positive note.
This is the most common point of confusion when it comes to security deposits. "Normal wear and tear" refers to the expected decline that happens from simply living in a space. Think minor scuffs on the walls from furniture, slightly worn carpet in high-traffic areas, or faded paint from sunlight. On the other hand, "damage" is caused by negligence, accidents, or abuse. This includes things like large holes in the wall, broken tiles, pet stains on the carpet, or a cracked mirror. Using a detailed move-out checklist can help you see your apartment from a landlord’s perspective and address any potential issues before the final inspection.
Your landlord can’t hold onto your deposit indefinitely. Each state has specific laws that set a deadline for returning your security deposit or providing a written explanation for any deductions. This window typically ranges from 14 to 60 days after you move out. It’s crucial to know the rule where you live, and you can check the security deposit return deadlines for your specific state. For example, in Colorado, landlords generally have 30 days unless the lease specifies up to 60. Knowing this deadline empowers you to follow up if you haven't received your deposit or an itemized list in time.
If your landlord keeps all or part of your deposit, they must send you an itemized list explaining each deduction and its cost. If you receive a list with charges you disagree with, or if you don't hear back within your state's deadline, don't panic. Your first step is to write a formal demand letter to your landlord disputing the charges and requesting the full return of your deposit. If that doesn't resolve the issue, your next option is often small claims court. Many tenant rights organizations offer resources and templates to help you navigate this process and stand up for your rights.
You’re in the home stretch! Once the boxes are packed and the cleaning is done, a few final administrative tasks will close out your lease properly. Taking care of these details ensures a clean break, helps you get your full security deposit back, and sets you up for a smooth transition into your next home.
Before you hand over the keys, make sure your financial obligations are squared away. This includes paying your final month's rent, which may be prorated depending on your move-out date. Don’t forget about your utilities. Call your service providers (electric, gas, internet, and water) to schedule a final meter reading and shut-off date. Pay any outstanding balances to close your accounts in good standing. Settling these final bills promptly is a crucial step in the security deposit return process, as landlords can often deduct unpaid rent or utilities from your deposit.
A little planning goes a long way in preventing moving day chaos. Touch base with your landlord or property manager about their specific rules for moving out. Ask about designated parking for moving trucks, service elevator availability, and any time restrictions. You should also confirm the logistics at your new place. Once you have your plan, you can schedule your new utility services to be turned on the day you move in. This simple coordination prevents headaches like having no power or trying to find parking for a giant truck at the last minute.
The most important document at this stage is the move-out checklist. This form details the property's condition when you leave and is your best tool for protecting your security deposit. Whenever possible, complete the final walkthrough with your landlord present, using the checklist to agree on the state of each room. Be sure to have your own move-in photos and notes handy for comparison. After the inspection, get a signed copy of the completed checklist for your records. Having this documentation, along with a ready-to-go Portable Tenant Screening Report for your next place, makes the entire rental transition feel organized and professional.
Moving out can feel like a huge project, but you don’t have to manage it all alone. Plenty of tools and services are available to make the process less stressful and more organized. From keeping track of your tasks to preparing for your next rental application, these resources can help you handle every step with confidence and ease.
A move-out checklist is your best friend when leaving a rental. It’s a simple list of everything you need to do, from cleaning the oven to patching nail holes, before you hand over the keys. Many landlords provide one, but using your own ensures you don’t miss a thing. A comprehensive checklist helps you stay organized, meet your landlord’s expectations, and avoid any last-minute surprises. Think of it as your roadmap to a smooth departure and a full security deposit refund. It’s one of the easiest ways to prevent misunderstandings and leave on good terms.
Let’s be honest, deep cleaning an entire apartment after you’ve packed everything is exhausting. To make sure the place is spotless and to get your full security deposit back, consider hiring help. Bringing in professional cleaning and repair services can be a smart investment. They know exactly what landlords look for during inspections and can tackle tough jobs like carpet stains or scuffed walls. Showing up to your final walkthrough with a professionally cleaned apartment leaves a great impression and gives you one less thing to worry about during a hectic move.
While you’re wrapping things up at your old place, you’re also getting ready for your new one. This is the perfect time to get your application materials in order. Instead of paying separate application fees for every apartment you like, you can use a single, reusable report. Modern solutions like portable tenant screening reports give you one comprehensive, secure report that includes your credit, background, and eviction history. You control who sees your information and for how long, which saves you time, money, and stress while you hunt for your next home.
How much notice do I really need to give my landlord? Your lease agreement is the first place you should look. It will state the exact notice period required, which is usually 30 or 60 days. If you're on a month-to-month lease or can't find it in your agreement, check your state's specific landlord-tenant laws for the legal minimum. Always give your notice in writing and get proof of delivery, like a certified mail receipt, to avoid any disputes later.
What's the difference between "normal wear and tear" and "damage"? I'm worried about being charged for every little scuff. This is a common concern, but the distinction is pretty clear. Normal wear and tear is the minor, expected decline from everyday living, like faint scuffs on a wall where your sofa was or slightly worn carpet in the main walkway. Damage, however, is caused by negligence or accidents, such as a large hole in the wall, a broken window, or significant stains on the carpet. Your landlord can charge for damage, but not for the gentle effects of you simply living in the home.
Is it really necessary for me to attend the final walkthrough? Yes, I highly recommend it. Being present for the final inspection allows you to discuss the apartment's condition with your landlord directly and in real time. You can immediately address any concerns they raise, point out pre-existing issues using your move-in photos, and prevent misunderstandings. It’s your last chance to advocate for yourself and ensure the assessment of the property is fair.
I forgot to take photos when I moved in. Is it too late to protect my security deposit? It's not too late, but you'll want to be extra thorough now. You can still take detailed photos and videos of the apartment's condition right before you move out. Focus on documenting how clean and well-maintained everything is. When you do the final walkthrough, bring a copy of your move-in inspection checklist if you have one. Clear communication and leaving the apartment in excellent condition will still go a long way in securing your deposit.
My landlord hasn't returned my deposit and the legal deadline has passed. What should I do first? Your first move should be to send a formal demand letter. This is a professional, written request for the full return of your security deposit, sent via certified mail so you have proof of delivery. In the letter, cite your state's law regarding the return deadline and state that your landlord has failed to comply. This simple, formal step is often enough to resolve the issue without needing to take further action.